Security is very important these days, especially, with the growing online industry. Due to this, there are certain vulnerabilities that your server and browser have to face. To combat this, SSL certificates are typically installed to add enhanced security to all your pages where the end-users are expected to submit their highly confidential data. When a web page uses an SSL certificate to secure a connection, the URL gets changed from HTTP to HTTPS and here the ‘S’ standing for ‘secure’. The users will also see a padlock and, that is in the case of extended validation certificates, and Comodo SSL certificates where the entire address bar will turn green. SSL certificates are issued to the websites by a trusted third party that is called as a ‘Certificate Authority’ (CA) and is available in a variety of types and validation levels.
Talking about Comodo SSL certificate
It is the quickest and the most reasonable way for an online business to protect users and customer online transactions. You may get a great value-added package which you can buy depending on your small to medium size businesses. If you chose Comodo SSL that means your site will enjoy the highest security levels and you’ll also get additional tools that will win your customer’s trust and increase the sales conversions.
A bit more about Comodo:
“Comodo” is one of the most accepted and trusted Certificate Authorities (CAs) and it provides a diverse set of SSL products. But, before you choose the best, you need to be familiar with the different types and features of SSL. Have a look:
Every website has different needs. Thus, in this quickly growing online marketplace, it is essential to separate SSL Certificates in the form of their feature, price, and usability. All the Comodo SSL Certificates offer 256-bit encryption with the latest SHA2 hash algorithm, but they are often different in terms of requirements. Every Comodo certificate comes with visual indicators that inform the users that the site uses SSL encryption.
Now let’s learn about how to install the SSL certificate with cPanel
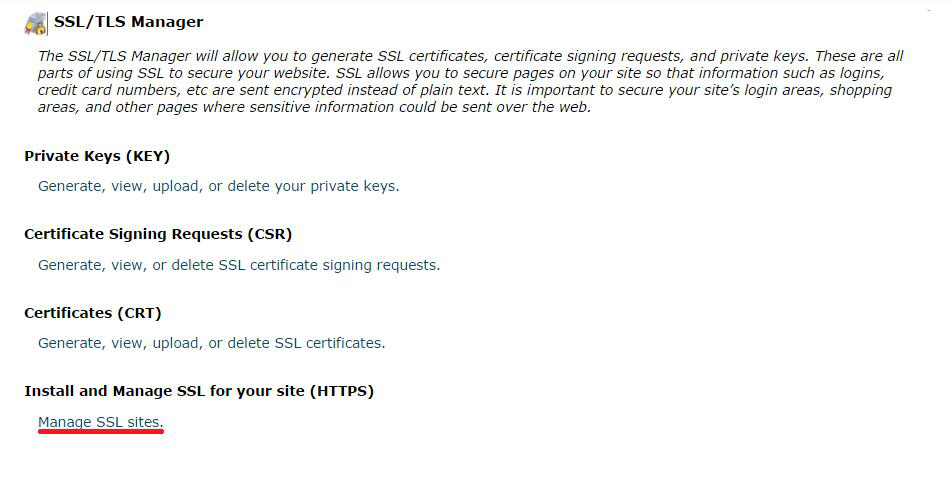
The process to install SSL certificate is not tough but needs to specify steps to follow. It happens with the latest cPanel 11.38 releases that come with this new SSL/TLS Manager which is available for cPanel users when enabled in WHM. This SSL/TLS Manager gives you the ability to generate, view, or upload, private keys, Certificate Signing Requests (CSR), and certificates (CTR) and also allows capacity to activate an SSL certificate on your website.
#1. First Generate CSR (Certificate Signing Request)
Step #1: Is a Dedicated IP Address needed?
Not really, because in many cases if you have Server Name Indication protocol (SNI), then it is no longer necessary for a site to have a dedicated IP address to utilize an SSL certificate.
Step #2: Assigning a Dedicated IP Address

Now, Log in to your Web Host Manager (WHM) and find the navigation section which is on the left side termed as IP Functions. In this section click on the Show IP Address Usage link as indicated below:
Step #3: Generate the Certificate Signing Request (CSR)
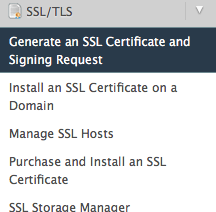
A CSR is a digitally signed file which is used to apply an SSL certificate from a certificate vendor. Now in your server’s WHM, find the navigation section that is labeled SSL/TLS and click on the link marked as Generate an SSL Certificate and Signing Request as indicated below:
#2. Process to Install Comodo SSL Certificate in Your Website
To install your own Comodo SSL certificate, first, you will need to login to your cPanel or WHM account. Both cPanel (the end-user control panel) and the WHM (the administrator panel) have varied ways to install the certificates. The installation process of Comodo SSL Certificate does not need any heavy training and it is very easy. If you want to use a Comodo digital certificate on WHM, but don’t know from where to start. Keep reading below you will find some very important steps and processes to follow to install SSL Certificate on WHM/Cpanel. If the Certificate Signing Request was not also created yet, then also do not worry… Keep Reading:

Step #1: The first step is the authentication of the SSL certificate via Certificate Authority (CA), then only rest of the processes will get started.
Step #2: Now the Installation Procedure of Comodo SSL Certificate using WHM/cPanel starts.
Please see: Only the administrator will be able to install the certificate, but if you are not an administrator then you have to get in touch with your admin.
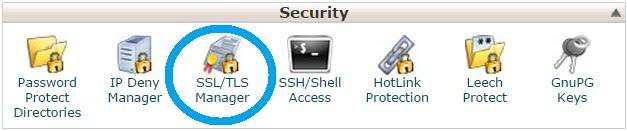
Step #3: Now login to your cPanel account, then: Locate and click on SSL/TLS Manager in the Security section
Step #4: Now Click on Manage SSL Sites under Install and the Manage SSL for your website (HTTPS) section
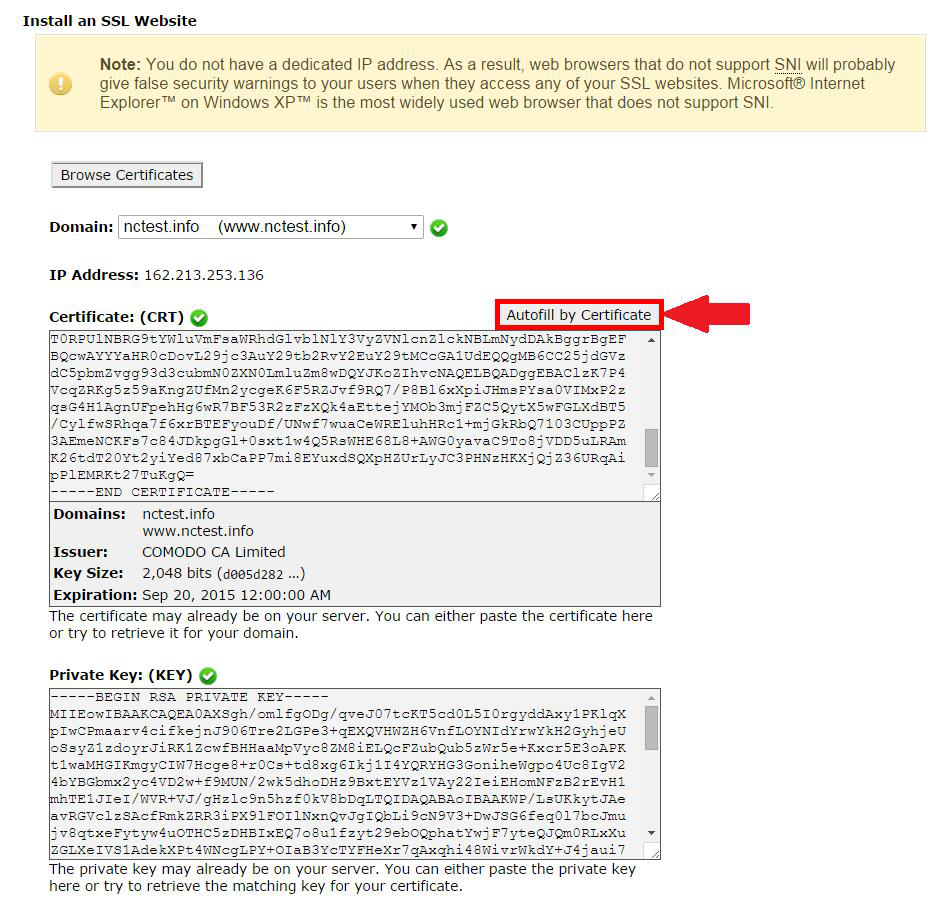
Step #5: Once you are done with generating a private key and has generated a CSR, now it’s time to install the SSL Certificate. SO now, when you click on “Manage SSL Sites”, you will see three different boxes:
- In the First Box – paste your domain/site certificate from the zip file that you received from Comodo
- Then please fill required valid required domain/user/IP address information
- In the middle box, you will have to paste the correct RSA private key that was generated with the CSR which you sent to Comodo to get your certificate generated
- Now, paste the correct CA bundle file for your certificate in the bottom box
Step #6: Now, click on the “Do it” button – The SSL Certificate is added to your server and assigned to the domain. Hurray! Here you will have to click on the Autofill by Certificate button, which appears next to the certificate entered, and then a system will attempt to fetch the domain name and the private key. You can also choose the domain from the drop-down list menu and manually enter the certificate and private key into the corresponding boxes. If the system fails to get the private key, you can locate it later in your Private Keys (KEY) section in SSL/TLS Manager. Make sure to include Begin/End headers and footers for the certificate and the key.
Step #7: Now, copy and paste the chain of intermediate certificates (CA Bundle) into the box under Certificate Authority Bundle (CA BUNDLE). You can also use this certificate for Mail Services; tick the checkbox ‘Enable SNI for Mail Services’. Here you can choose your own domain where your SSL certificate has been installed. But please note that this option is only available starting from cPanel 11.48. If you are using an older version of cPanel, you cannot use your certificate for mail.
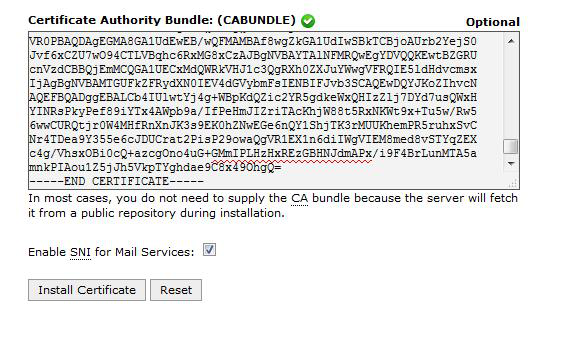
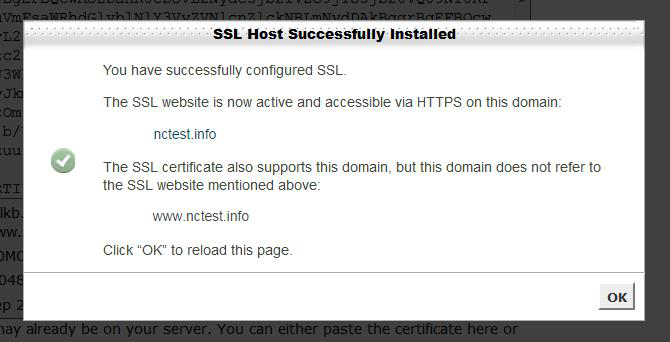
Step#8: Click on the ‘Install Certificate’ button. Congratulations! You did it! The Comodo certificate is now installed on the server for your site. Your site should now be accessible through https://. You can check your SSL Certificate installation using this tool
To conclude, we hope all the above steps are quite clear and informative in explaining the importance and installation process of Comodo SSL certificate. Write to us for more information.